How To Clean Your Ninja Coffee Machine
Stop It. Just Stop.
Look, you bought a Ninja coffee machine. Probably one of those fancy ones that makes frothy nonsense or brews a whole carafe. Don’t act like you’re some kind of barista savant. The thing is, these things get gross. Faster than you’d think. And if you’re just sipping that sludge, thinking it’s coffee? You’re lying to yourself. This is How To Clean Your Ninja Coffee Machine, the only guide you’ll ever need. Because honestly, I’m tired of seeing people treat their expensive appliances like garbage disposals.
I remember my buddy, Dave. Bought a Ninja back in ’19. Paid like $200 for it. Didn’t clean it once for two years. Two years! The coffee tasted like burnt plastic and regret. He just kept buying more expensive beans, blaming the coffee, not the machine. Idiot. That’s the kind of person this guide is for. The clueless ones. The ones who need a swift kick in the pants. And a clean coffee maker.
The Grim Reality of Neglect
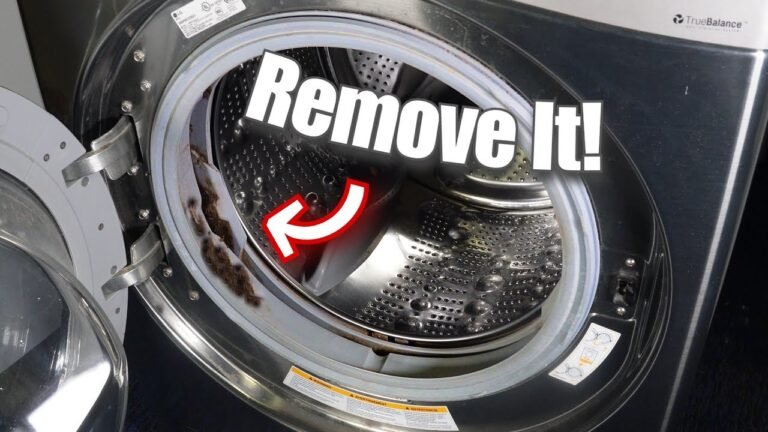
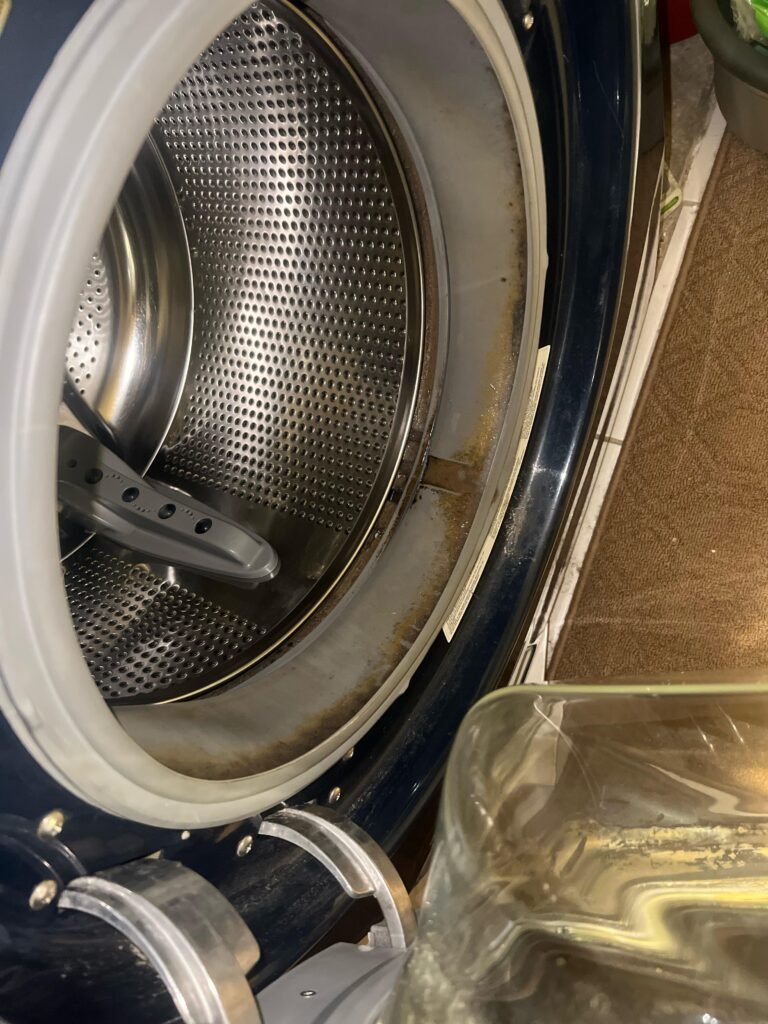
Your Ninja machine isn’t just brewing coffee. It’s breeding bacteria. It’s cultivating mold. It’s becoming a science experiment. Mineral deposits? Yeah, they’re there too. Clogging things up. Making your coffee taste like a rusty pey. It’s vile. Honestly. You wouldn’t let your dishes pile up for weeks, right? So why are you doing it to your coffee maker?
Think about it. That warm, moist environment? Perfect breeding ground. That’s not coffee you’re drinking. It’s a biological hazard. Served hot. The sheer laziness. It boggles the mind.
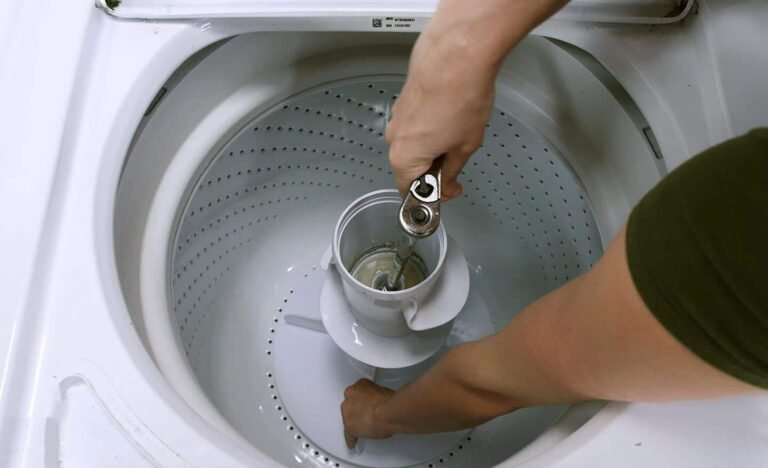
Step 1: The Great Dismantling
First things first. Unplug the damn thing. Safety first, you moron. Then, you gotta take it apart. What parts? The removable bits, obviously. The carafe. The filter basket. If you have one of those fancy frothers, take that off too. Everything that touches coffee or water needs a good scrub.
Don’t just eyeball it. Take pictures if you have to. Seriously. Some of these parts are fiddly. You don’t want to be wrestling with it later, trying to figure out where that weird plastic bit goes. Just get it all laid out. Like a crime scene. Because in a way, it is. A crime against good coffee.
Watch: Ninja Luxe™ Café Premier Series | How to Clean and Maintain
Carafe and Filter Basket Liberation
These are the big hitters. The ones that collect the most gunk. Rinse them out immediately after use. Don’t let that coffee residue sit and congeal. It’s a pain in the ass to get off later. Trust me on this. I learned the hard way.
Water Reservoir Revelation
The water reservoir. People forget this. It’s not just a passive holder. It collects dust. It can get slimy. You need to empty it, wipe it down. Make sure no creepy crawlies have taken up residence. I found a spider once. A small one. Still gross.
Watch: How to Clean (Backflush) Your Ninja Luxe Cafe
Step 2: The Soapy Showdown
Grab some warm water. Dish soap. Not that industrial degreaser stuff. Just regular Dawn or whatever cheap brand you got. A soft sponge or cloth. This is not the time for steel wool. You’re cleaning, not stripping paint.
Wash everything. The carafe. The filter basket. The lid. Get into the nooks and craies. If you have a brush, use it. Those little coffee grounds love to hide. Especially around the rim of the carafe or the base of the filter basket. Don’t miss those spots.
The Carafe Cleanse
Scrub the inside. The outside. The handle. Make sure you get all the dried coffee stains off. They’re stubborn. Sometimes a little extra soap and elbow grease is needed. Don’t be shy. Your coffee deserves better.
Filter Basket Fury
Pay attention to the mesh. If you have a reusable filter, this is key. Clogged mesh means bad flow. Bad taste. You might need a small brush to get it all out. Rinse it thoroughly. You don’t want soap residue mingling with your next brew.
Step 3: The Rinse and Repeat (Seriously)
Rinse everything. Thoroughly. You don’t want any soap taste. Or any leftover coffee sludge. Hot water is your friend here. Make sure all the suds are gone. All the loose grounds. Gone. Vanished. Poof.
Watch: How To Clean The Ninja Luxe Cafe Espresso Machine.
This is crucial. A trace of soap can ruin a whole pot. It’s like adding salt instead of sugar to your coffee. A rookie mistake. Don’t be that guy.
Step 4: The Air Dry Discipline
Let it all air dry. Completely. Don’t just put it back together wet. That’s asking for trouble. Mold. Mildew. You name it. Find a dish rack. Spread the parts out. Give them space. Let the air do its thing.
Honestly, I usually just leave mine overnight. Let it dry properly. Better safe than sorry. Especially with coffee makers. They’re basically humidifiers for your kitchen counter. But for gross stuff.
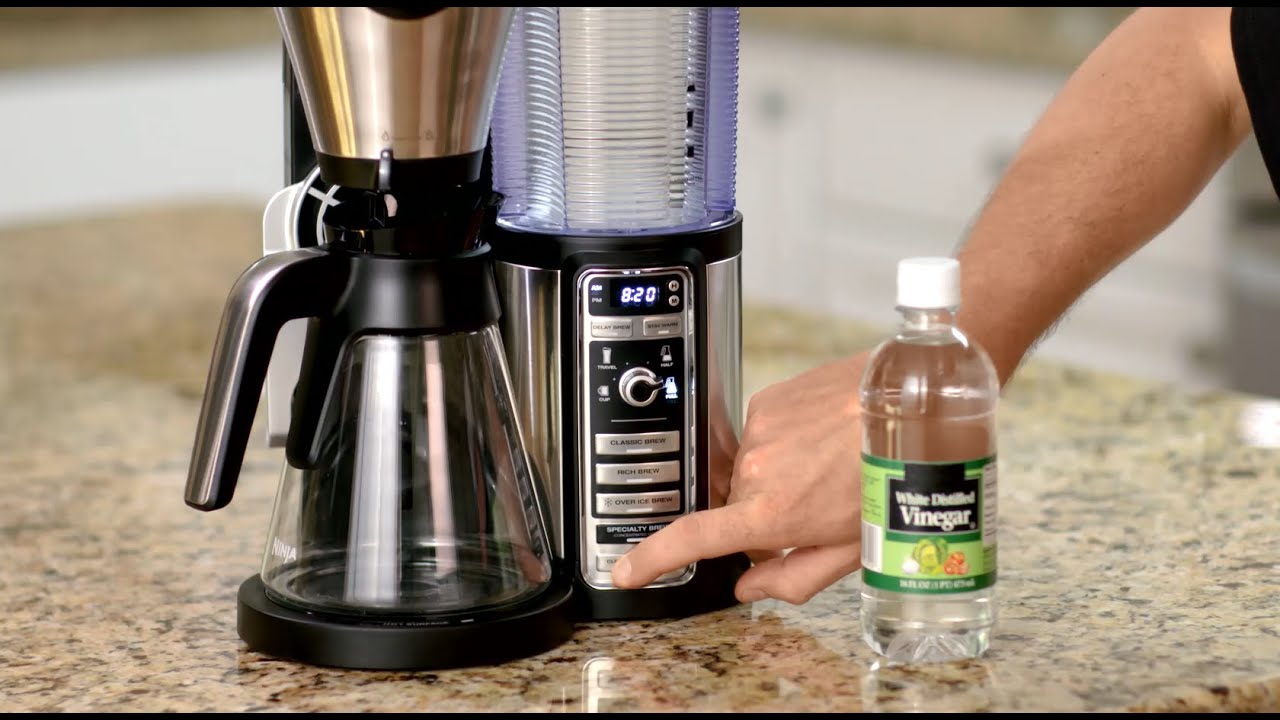
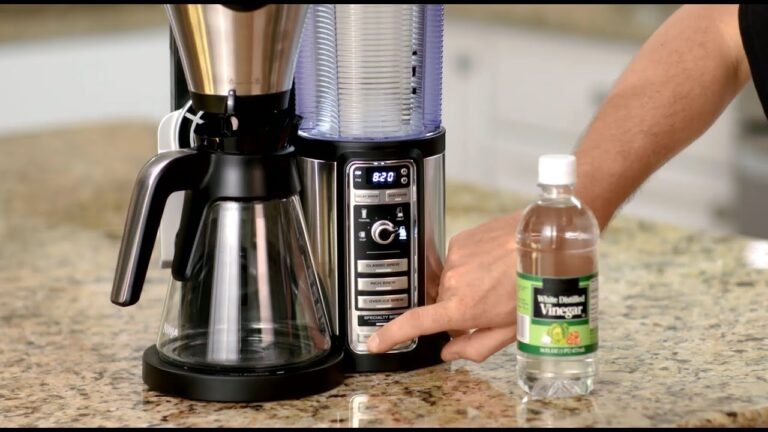
Step 5: The Descale – The Real Battle
Now for the deep clean. The one most people skip. Descaling. Your Ninja machine has mineral buildup. From the water. It’s inevitable. Like taxes. Or death. This is where vinegar or a descaling solution comes in. Vinegar works. It’s cheap. But it smells. For days. A dedicated descaling solution is better. Less funk. But costs money. Your choice.
The process varies slightly by model. Check your manual. But generally, it involves filling the reservoir with a mix of water and vinegar/solution. Then ruing a brew cycle. Or a specific “clean” cycle. It’s a pain. It takes time. But it’s necessary.
Vinegar vs. Descaling Solution
| Method | Pros | Cons | Cost |
|---|---|---|---|
| White Vinegar (50/50 mix with water) | Cheap. Readily available. Effective. | Strong smell. Can take multiple rinses to remove smell. | $ |
| Commercial Descaling Solution | Designed for coffee makers. Less odor. Often faster. | Costs money. Need to buy it specifically. | $$ |
Look, I used to be a vinegar guy. Back in the day. When I was a broke student making instant coffee. But now? I’m all about the dedicated solution. The smell of vinegar lingering around my kitchen for days? No thanks. It’s worth the extra few bucks. To be fair, it’s not that much extra.
Ruing the Clean Cycle
Fill the reservoir with your chosen solution. Place the carafe. Start the cycle. Let it run. It might take an hour. Maybe more. Don’t interrupt it. Let it finish its dirty work. Then dump the hot, nasty liquid. Into the toilet. Don’t pour it down the sink. It’s gross.
The Rinse Cycles – Essential!
This is where you get rid of the descaling solution. Or vinegar. Fill the reservoir with fresh water. Run a full brew cycle. Dump the water. Repeat. At least twice. Three times is better. You want absolutely no trace of that stuff left. Smell it. Taste the water. If it smells or tastes off, run another cycle. No shortcuts here.
I remember a time I didn’t rinse enough. My coffee tasted like sour cleaning fluid for a week. It was revolting. I almost threw the whole machine out. Don’t make my mistake. Rinse. Rinse again. Rinse some more.

Step 6: The Exterior Wipe-Down
Don’t forget the outside. Stainless steel. Plastic. Wipe it down. Use a damp cloth. Maybe a little diluted cleaner. Make sure you get the warming plate. The control panel. The drip spout. All that stuff collects fingerprints. Coffee splatters. General kitchen grime. It makes the whole machine look old and neglected.
And nobody wants an ugly coffee machine. It’s the centerpiece of your morning ritual. It should look good. Or at least, not disgusting.
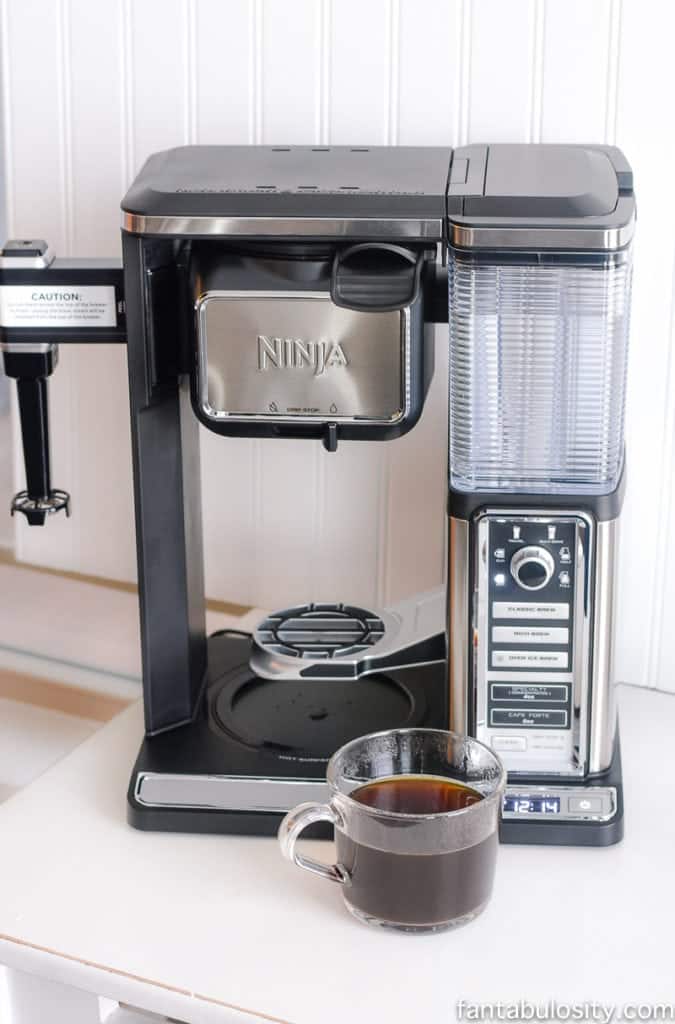
Step 7: Reassembly and Pride
Once everything is dry. And I mean bone dry. Put it all back together. The carafe. The filter basket. If you have any extra bits, reattach them. Plug it back in. Admire your work. You’ve just saved your coffee machine from a slow, grimy death. And probably your taste buds too.
Now, brew yourself a cup. A real cup. Not that sludge you were drinking before. Taste the difference. It’s worth it. Honestly. It really is.
Maintenance is Key: Don’t Be a Dave
This whole process shouldn’t be a once-a-year deep clean. Do the daily rinses. The weekly wipe-downs. The monthly deep clean (descaling). Make it a habit. It takes like 10 minutes. Max. Compared to the hour it takes when it’s truly caked in gunk.
Treat your Ninja coffee machine right. It’ll treat you right. With delicious coffee. Instead of that bitter, burnt, bacteria-filled swill you were probably drinking. Don’t be that person. Be the person with the clean machine. And the good coffee.
I saw a guy at my local coffee shop the other day. He had one of those top-of-the-line machines. Shiny. He was wiping it down with a microfiber cloth after every single use. After every use! I almost tipped him. That’s dedication. That’s what we’re aiming for here. Not that level of obsessive, but you get the point. Consistency matters.
Frequently Asked Questions
How often should you clean your Ninja coffee machine?
Daily rinsing of removable parts is crucial. A quick wipe-down of the exterior weekly is good. For the deep clean, descaling your Ninja coffee machine every 1-3 months is recommended, depending on your water hardness and usage. If you see visible scale or your coffee starts tasting off, clean it sooner.
How do I descale my Ninja coffee machine without vinegar?
You can use a commercial descaling solution specifically designed for coffee makers. Follow the product’s instructions, which usually involve mixing the solution with water in the reservoir and ruing a brew cycle, followed by several rinse cycles with fresh water.
Can I put my Ninja coffee machine parts in the dishwasher?
Check your specific Ninja model’s manual. Many removable parts, like the carafe and filter basket, are top-rack dishwasher safe. However, handwashing with warm, soapy water is often recommended to prolong their life and ensure thorough cleaning.
What happens if I don’t clean my Ninja coffee machine?
If you don’t clean your Ninja coffee machine, mineral deposits (scale) will build up, affecting brewing temperature and speed, potentially ruining your coffee’s taste. More importantly, stagnant water and coffee grounds create a breeding ground for bacteria and mold, making your coffee unsanitary and potentially harmful.
How do I clean the warming plate on my Ninja coffee machine?
Ensure the machine is unplugged and cool. Wipe the warming plate with a damp cloth. For stubborn stains, use a soft sponge with a little mild dish soap. Avoid abrasive cleaners or scouring pads that can scratch the surface. Never immerse the warming plate in water.