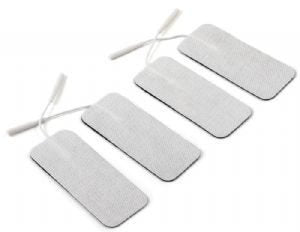
How To Clean Tens Machine Pads
Stop Treating Your TENS Pads Like Gold Bars. Clean Them. Or Else.
Look, you spent good money on that TENS unit. Don’t screw it up by neglecting the pads. Honestly, this ain’t rocket surgery. But people botch it. Every. Single. Time. You paid for pain relief, not a greasy mess that barely sticks. This is how To Clean Tens Machine Pads. Do it right. Or just buy new ones every month. Your call.
The thing is, those sticky gel pads? They’re not magic. They get dirty. They lose their juice. That’s physics. But you can fight back. You can extend their life. You can make ’em stick again. It’s not complicated. It’s just… aoying. Like most things worth doing.
I remember my first TENS unit. Bought it on a whim. Figured it was snake oil. Turns out, it worked. Like, really worked. But my pads? Useless after a week. I was this close to tossing the whole damn thing. Then I found out about cleaning. Changed my life. Or at least my pain levels. Seriously.
Why Bother Cleaning These Stupid Things?
Simple. Money. And effectiveness. Dirty pads = weak current. Weak current = no pain relief. No pain relief = you’re still hurting. Plus, think about it. You’re sticking these things to your skin. Sweat. Dead skin cells. Lotion. All that gunk builds up. It’s gross. And it creates a barrier. That barrier stops the electrical current from doing its job. It’s like trying to hear music through a brick wall. Doesn’t work.
Clean pads mean better conductivity. Better conductivity means stronger, more targeted relief. Plus, you can get maybe 20-30 uses out of a pair if you’re careful. Compare that to maybe 5-10 if you just trash ’em. That’s a huge difference. 20 uses versus 5? That’s like saving 75% on pads. Do the math.
My buddy, Gary, bless his heart. He’s an idiot. Buys new pads every two weeks. Calls it ‘preventative maintenance‘. I call it ‘wasting money’. He doesn’t listen. Never does. Probably still thinks static cling is a superpower.

The Right Way: A Step-by-Step Slaughter of Grime
Okay, here’s the drill. Forget fancy sprays. Forget weird rituals. This is basic hygiene. And a little bit of physics manipulation.
Step 1: The Gentle Rinse
First off, get your hands clean. Seriously. Wash ’em. Don’t transfer more crap onto the pads. Now, peel the pads off your skin. Gently. Don’t yank. You’ll tear ’em. If they’re truly trashed, well, nothing here will save them. But if they’re just… dull? We can work with this.
Run them under cool, clean tap water. No soap. No detergents. Nothing. Just water. You’re not washing a car here. You’re just rinsing off the surface gunk. Let the water flow over the gel side. Be gentle.
Think of it like this: you’re washing away the dust. Not scrubbing off embedded grease. Soap strips the gel. It’s designed to be slightly sticky. Soap makes it slippery. And useless. So, just water. Cool water. That’s it.
Step 2: The Delicate Drying
This is where most people screw up. They rub. They blot hard. They use paper towels that shred. DON’T. You need to dry them without damaging that precious gel surface. Grab a lint-free cloth. A microfiber towel is ideal. If you don’t have one, a clean, soft cotton cloth that doesn’t shed will do. I use one of those ridiculous microfiber cloths you get from cleaning glasses. Works like a charm.
Gently dab the pads. Don’t rub. You’re not buffing. You’re just absorbing moisture. Let them air dry the rest of the way. Lay them gel-side up on a clean, dry surface. Away from direct sunlight. Dust. Or your cat. Cats are agents of chaos, man.
I once saw a guy use a hairdryer on them. ON THEM. Said it was faster. Faster to ruin, maybe. That heat fries the adhesive. It makes the gel brittle. Then it cracks. Then they’re toast. Just let them air dry. Patience. It’s a virtue your sore muscles will thank you for.
Step 3: The Re-Sticking Ritual
Once they’re completely dry – and I mean bone dry, not just ‘not wet’ – you can put the protective backing sheets back on. If you lost them, tough luck. Use plastic wrap in a pinch, but it’s fiddly. The original backing is best. It’s designed to protect that sticky surface.
Press the backing on firmly. Make sure it adheres evenly. This keeps dust and debris off the gel. It preserves the stickiness. Store them flat. Not bunched up. Not folded. Flat.
I keep mine in a small plastic container. In a drawer. Cool, dark place. Prevents them from drying out too fast. Or getting mangled. Simple, effective. Like good pain relief.
What NOT To Do: A Field Guide to Pad Destruction
This is crucial. Seriously, pay attention. These are the cardinal sins of TENS pad maintenance. Commit them, and you’re buying new pads. Guaranteed.
Don’t Use Soap, Alcohol, or Solvents
I said it before. I’ll say it again. Soap is the enemy. Alcohol strips the gel. Solvents? Forget it. They’ll dissolve the darn things. The gel is specifically formulated. Messing with it is career suicide for your pads. Stick to water. Just water. It’s not complicated.
Think about it. You’re using these for therapeutic purposes. You want harsh chemicals leaching into your skin? No. You want a gentle, conductive medium. That’s what the gel is. Don’t degrade it.
My cousin Brenda, she’s a ‘chemist’ apparently. Thought she knew better. Used some ‘special cleaning solution’ she whipped up. Smelled like acetone and regret. Her pads lasted maybe two uses after that. Shocker.

Don’t Rub or Scrub
The gel surface is delicate. It’s not a frying pan. Scrubbing tears it. It creates microscopic canyons where dirt collects. And makes the pad useless. Gentle dabbing is all that’s required. Think whisper. Not shout. Think ‘mopping up a spill.’ Not ‘power washing a driveway.’
I saw a guy on YouTube literally polishing his pads with a cloth. Polishing! Like they were antique furniture. Madness. The gel layer is thin. Respect its fragility. Or lose its stick. Simple cause and effect.
Don’t Air Dry in Direct Sunlight or Heat
Sunlight and heat are pad killers. They break down the adhesive polymers. They make the gel brittle and prone to cracking. You want them to dry in a moderate environment. Cool, dry, out of the sun. Like storing fine wine. But for your TENS pads.
Leaving them on the windowsill? Bad idea. Laying them on a hot dashboard? Even worse. Just find a normal spot. A shelf. A table. Away from windows. Away from heaters. It’s not asking much.
Don’t Store Them Improperly
This is a big one. Pads need protection. Storing them uncovered is asking for trouble. Dust buies will become permanent residents. Hair will find its way onto the gel. The gel will dry out unevenly.
Always use the original protective backing. Store them flat. Ideally, in a sealed container. This protects the gel surface from contaminants and helps maintain its adhesive properties. Don’t just toss them in a drawer loose. That’s asking for disappointment.
Watch: The Best Way to Care for your Electrodes
Extending Pad Lifespan: Pro-Tips from a Cynic
Cleaning is essential. But there’s more you can do. Small habits add up. These aren’t revolutionary. Just sensible.
Prep Your Skin
This is huge. Before you even stick the pads on, make sure your skin is clean and dry. Any lotions, oils, or even sweat will create a barrier. This not only makes the pads stick less, but it also contaminates the gel faster.
Wash the area with mild soap and water. Pat it dry thoroughly. Don’t apply any creams or lotions beforehand. Think of your skin as the canvas. You want a clean canvas for the best adhesion and performance.
I used to skip this. Thought it was overkill. My pads lasted maybe 3 uses. Now? I do the prep. Pads last me 15-20 uses easy. The difference is night and day. Worth the extra two minutes, trust me.
Apply and Remove Gently
When you apply the pads, smooth them down evenly. Don’t stretch or distort them. When you remove them, peel slowly and carefully. Lift from the edge. Don’t rip them off.
Yanking pads off rips the gel. It leaves residue on your skin. And damages the pad’s structure. Gentle application and removal preserve the integrity of the gel layer. They make the pads last longer. It’s basic mechanics, really.
Store Them Correctly – Again
I’m repeating this because people are idiots. Store them flat. With the backing sheets on. In a cool, dry place. Away from direct sunlight. This is non-negotiable. If you lose the backing sheets, you’re on borrowed time.
I know some people use Ziploc bags. It’s better than nothing. But the original backing is superior. It conforms perfectly. It protects the gel evenly. Don’t cut corners here. Your wallet will thank you.
When Are They Truly Dead? Signs Your TENS Pads Need Replacing
Even with perfect care, pads don’t last forever. Eventually, they lose their ability to conduct effectively. They just give up. Here’s how to tell.
Visible Damage
Tears. Cracks. Gaping holes. If the gel layer looks physically compromised, it’s time to chuck them. They won’t conduct evenly. You risk hot spots or weak spots. And they certainly won’t stick well.
Any pad that looks like it went through a shredder is officially retired. Don’t try to salvage it. Just replace it. Your skin will thank you. Your nerves will thank you.
Significant Loss of Adhesion
If you’ve cleaned them properly, and they still won’t stick securely, they’re probably done. A slight decrease in stickiness is normal and expected. But if they’re sliding off, or you have to hold them in place, they’ve reached the end of their useful life.
To be fair, sometimes a really thorough cleaning can revive them. But if you’ve done that, and they still peel off after a few minutes, they’re toast. Don’t try to force it. Use the electric current assessment below.
Watch: Taking Care of Your TENS Pads Make Sticky Again & Last …
Uneven or Weak Sensation
This is the ultimate test. When you turn on your TENS unit, do you feel the stimulation evenly across both pads? Or is it weak in one spot? Or do you feel tingling in one area and nothing in another? That’s a sure sign of a failing pad. Or pads.

The current needs a clear path. If the gel is degraded or damaged, it creates resistance. This leads to uneven current distribution. If the sensation feels ‘off’, assume the pads are the culprit. Replace them.
Cost Breakdown: Cleaning vs. Replacing
Let’s get real about the money. Pads aren’t cheap. Especially the good ones. You can spend anywhere from $10 to $30 for a pair. And they typically last 20-30 uses if you care for them. If you don’t? Maybe 5-10 uses.
So, if a pair costs $15 and lasts 20 uses, that’s $0.75 per use. If they only last 5 uses? That’s $3.00 per use. That’s a massive jump. Cleaning them properly keeps them in that $0.75 range. Trashing them pushes you towards that $3.00 mark.
Consider a year of use. Say you use your TENS unit 3 times a week. That’s about 156 uses a year. If pads last 20 uses, you need 8 pairs. At $15 a pair, that’s $120 a year. If pads only last 5 uses, you need ~31 pairs. At $15 a pair, that’s $465 a year. You do the math. Cleaning saves you hundreds.
| Scenario | Average Cost Per Pair | Uses Per Pair | Pairs Needed Aually (156 Uses) | Total Aual Cost |
|---|---|---|---|---|
| Properly Cleaned | $15.00 | 20 | 8 | $120.00 |
| Neglected / Discarded Early | $15.00 | 5 | 31 | $465.00 |
| Generic Cheap Pads (Neglected) | $7.00 | 4 | 39 | $273.00 |
Look, I’m not saying cleaning is free. It takes time. It takes effort. But the return on investment is huge. You save money. You get better pain relief. It’s a win-win. Why wouldn’t you do it?
Common Mistakes That Lead to Pad Failure
People are predictable. They make the same mistakes over and over. Especially with things like TENS pads. Here are the biggest culprits I see:
Mistake 1: Over-Cleaning
Thinking more is better. Using too much water. Scrubbing too hard. Trying to get them ‘squeaky clean’ like dishes. That’s not the goal. The goal is to remove surface debris. Not to strip the gel.
Remember, the gel is delicate. Overdoing it damages it. It makes them less sticky. It makes them wear out faster. Less is more here. Gentle rinsing. Gentle dabbing. That’s the mantra.
Mistake 2: Impatience
Rushing the drying process. Trying to stick them back on when they’re still damp. Or using heat to speed it up. That’s a recipe for disaster. Damp pads don’t stick well. They can cause skin irritation. Heat fries the gel.
Watch: How to Use and Care For Your OMRON TENS Unit Long Life …
Patience is key. Let them air dry completely. It might take a few hours. Plan ahead. Clean them after use. Let them dry overnight. Stick them on fresh in the morning. It’s not rocket science. It’s just discipline.
Mistake 3: Using the Wrong Cleaning Agents
The allure of a ‘quick fix’. Grabbing whatever cleaning product is handy. Alcohol wipes. Hand sanitizer. Dish soap. This is the fast track to pad death. These chemicals destroy the gel structure. They compromise conductivity.
Stick to the plan: cool water rinse only. If you can’t manage that, then frankly, you probably shouldn’t be using a TENS unit. It requires a modicum of care.
Mistake 4: Poor Storage Habits
Just tossing them in a bag. Leaving them exposed. Storing them folded or creased. These actions degrade the pads. They attract dirt. They cause uneven drying. They ruin the sticky surface.
Always use the protective backing. Store them flat. In a clean, sealed container. Treat them like the sensitive medical accessories they are. Not like old chewing gum.
Final Thoughts: Treat Your Pads Right, They’ll Treat You Right
How To Clean Tens Machine Pads. It’s not a dark art. It’s basic maintenance. Do it right, and you save money. You get better pain relief. You extend the life of your equipment. It’s simple. Clean pads = happy user. Dirty pads = constant expense and mediocre results.
Don’t be Gary. Don’t be Brenda. Be smart. Be efficient. A little care goes a long way. Your wallet, and your aching body, will thank you.
Frequently Asked Questions
How to make TENS pads sticky again reddit?
On Reddit, you’ll see a lot of advice. Mostly good, some bad. The consensus for making them sticky again boils down to a gentle rinse with cool water. No soap, no alcohol. Just water. Then, dab them very gently with a lint-free cloth or let them air dry completely. Finally, reapply the protective backing sheets. This process removes skin oils and debris that interfere with adhesion. Sometimes, a second rinse can revive pads that aren’t totally dead. But if they’re visibly torn or completely smooth, no amount of cleaning will help. It’s about removing contaminants, not regenerating the gel.
How often should I change TENS pads?
This heavily depends on usage and care. If you clean and store your TENS pads properly, you can expect anywhere from 15 to 30 uses per pair. Some people even get more. If you don’t care for them, they might only last 5 uses. The key is when they stop sticking effectively, or when the sensation feels weak or uneven. Visually inspect them for tears or cracks. Honestly, change them when you notice a significant drop in performance or adhesion, even after proper cleaning. Don’t push them past their limits; it affects treatment effectiveness and can potentially cause skin irritation.
Can I use electrode gel with my TENS pads?
Generally, no. Most TENS machine pads come with a pre-applied hydrogel layer that is designed to be conductive and adhesive. Adding extra electrode gel can actually interfere with this pre-applied layer, making the pads less sticky and potentially reducing conductivity. The gel is already there to facilitate current flow. Trying to add more is usually counterproductive unless your specific TENS unit or pad manufacturer explicitly recommends it for certain applications, which is rare for standard self-adhesive pads.
What happens if TENS pads don’t stick?
If your TENS pads aren’t sticking well, it’s usually due to one of a few reasons: they are dirty (skin oils, debris), the gel layer is degraded from age or improper cleaning/storage, or they are physically damaged (tears, cracks). If they’re dirty, try cleaning them according to the instructions. If cleaning doesn’t help, or if they are old and worn out, it’s time to replace them. A poor coection means inconsistent current delivery, which can lead to ineffective pain relief and potentially skin irritation due to uneven current density.
Are TENS pads reusable?
Yes, TENS pads are designed to be reusable. However, ‘reusable’ doesn’t mean ‘indefinite.’ The self-adhesive hydrogel layer on the pads will naturally degrade over time and with use. Proper cleaning (a simple rinse with cool water) and storage (flat, with protective backing, in a cool, dry place) is crucial for maximizing their lifespan and maintaining their adhesive properties. Without this care, their reusability is significantly shortened, often leading to needing replacements much sooner than necessary.